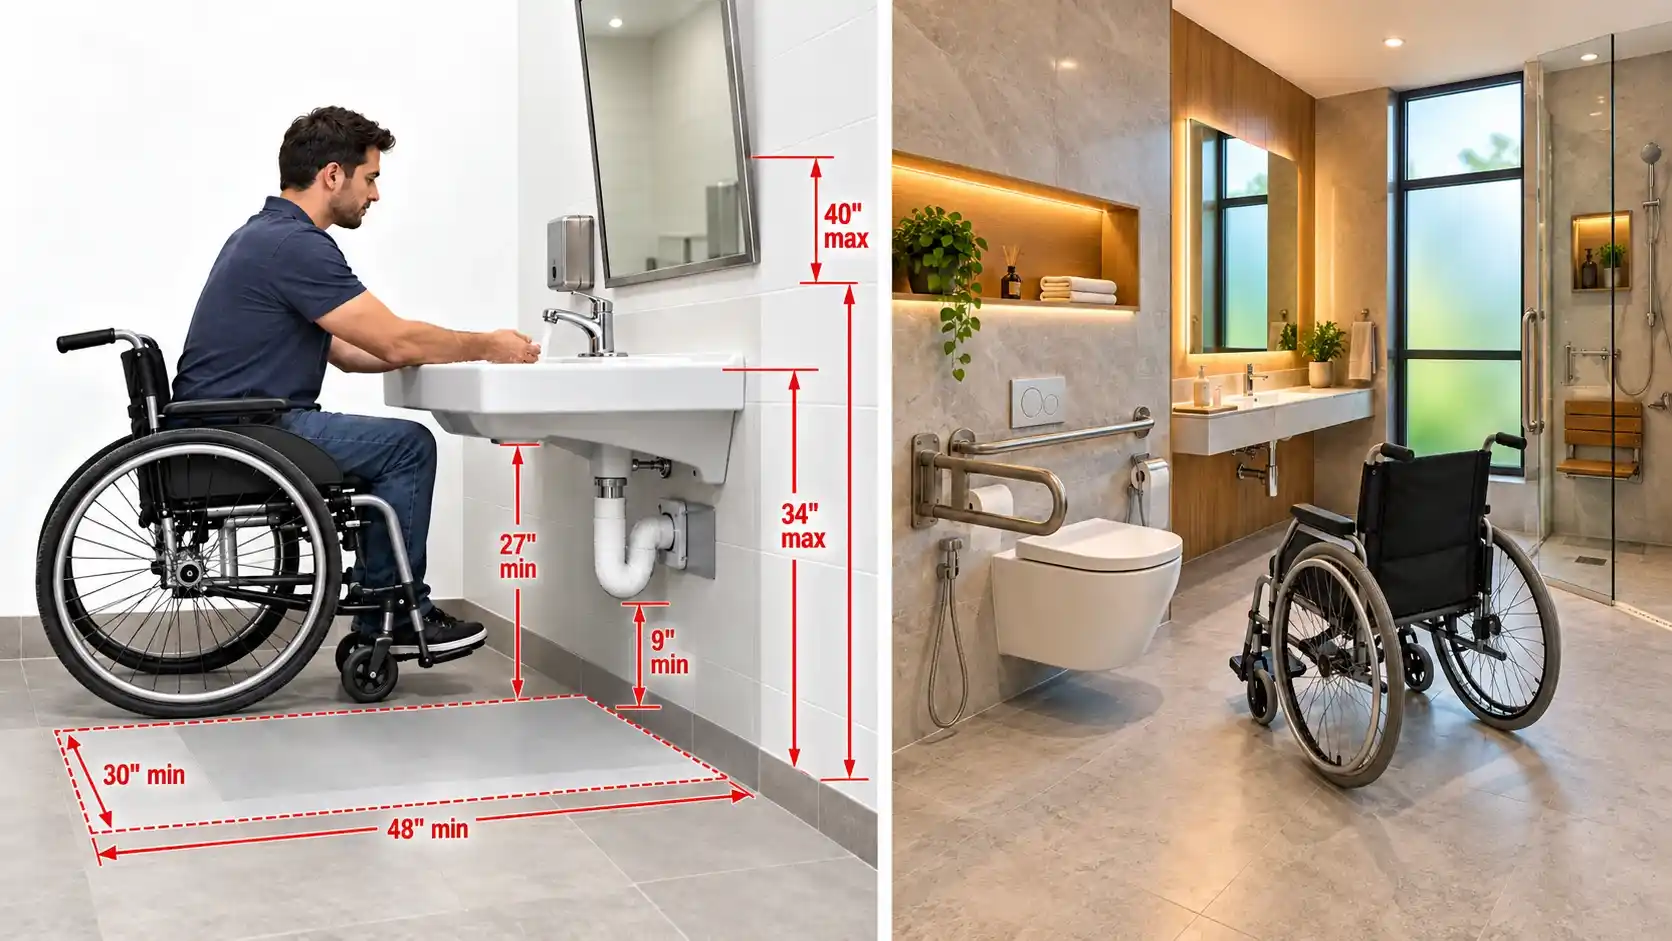
Quick answer: The ADA applies to public and commercial buildings, not private single-family homes. Homeowners can still borrow the standards: a 60-inch turning space, toilet centered 16–18 inches from the side wall, grab bars at 33–36 inches, and a 30×60-inch roll-in shower.
Quick takeaways
- The ADA is a civil-rights law for public and commercial buildings. Your own house usually isn’t covered.
- Its numbers are still the most-used benchmark for a wheelchair-accessible home bathroom.
- Space is the real constraint. Turning space, toilet clearance and shower size all fight over the same footprint.
- Grab bar blocking is cheap before drywall and expensive after tile.
- The UK, Canada and Australia use different rulebooks (table below).
- The minimum works for a standard manual wheelchair. Power chairs and helpers need more room.
Search “ADA bathroom requirements” and you land on pages written for restaurant owners. The dimensions are usually right. The context is usually wrong, and that context is what decides whether you spend $800 or $8,000.
Does the ADA even apply to a bathroom in your house?
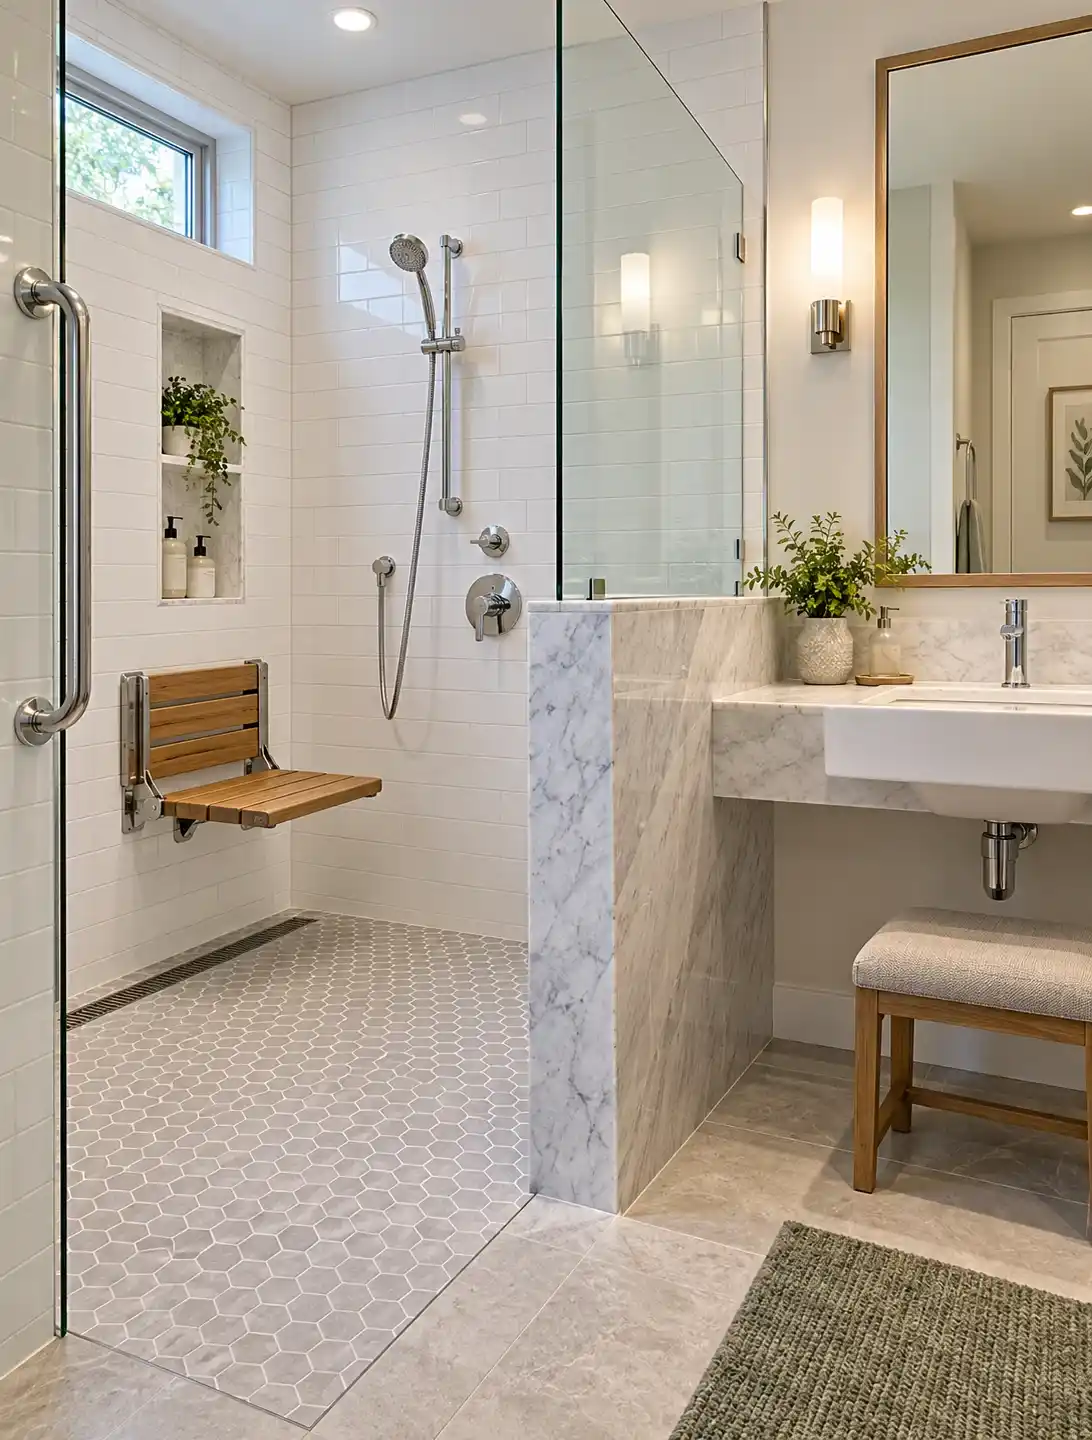
Here is the part most guides bury. The ADA is a federal civil-rights law, and its design standards govern places the public uses: shops, offices, restaurants, clinics, hotels. A private single-family house isn’t on that list. Neither are the Fair Housing accessibility rules or most building codes.
So why does every accessible-bathroom plan quote ADA numbers? Because they are the best-tested benchmark going. Builders, occupational therapists and inspectors all speak that language, and most places have nothing equivalent for houses.
There are exceptions worth checking. Renting rooms to the public, running a business from the property, or building under a local planning condition can change the picture. Your local building authority has the final word.
Treat the ADA as a design reference, not a legal checklist. That distinction saves money, because some commercial rules were written for strangers sharing a room, not one household with known needs.
ADA, Part M, NBC or NCC: which rulebook governs your bathroom?
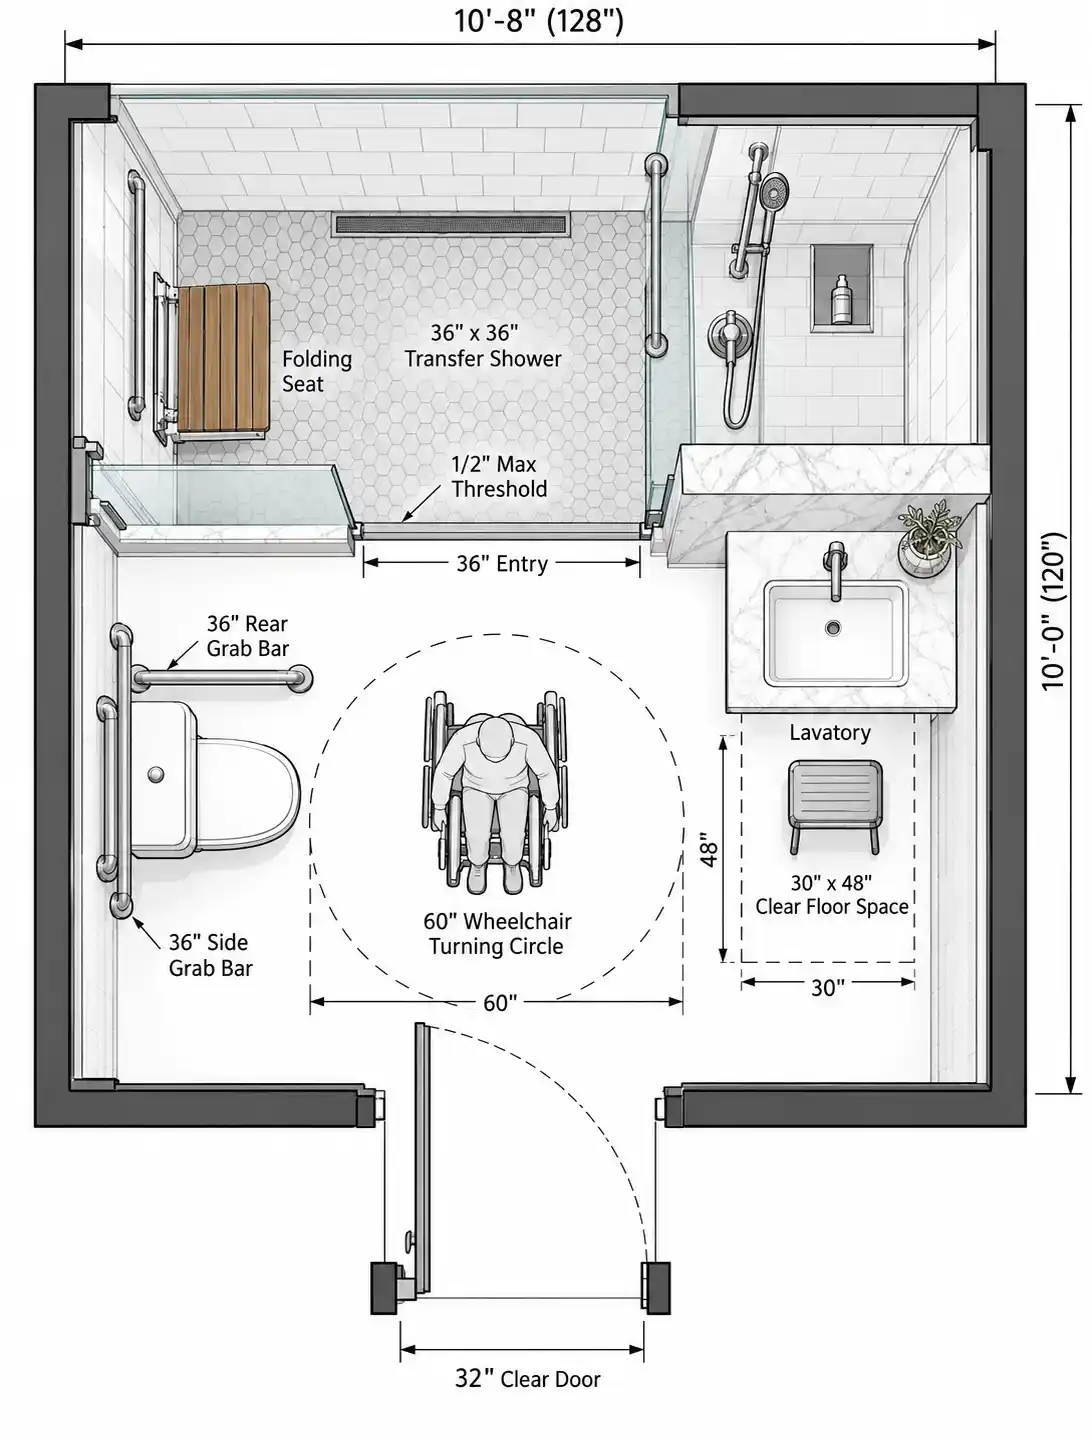
What applies depends on the country, and often on the state or province too. This table gives principles rather than exact figures where they vary.
| Area | US | UK | Canada | Australia |
|---|---|---|---|---|
| Rules for private homes | ADA, Fair Housing accessibility rules and most codes don’t cover single-family homes; local code and voluntary design govern | Building Regulations, Approved Document M, optional M4(2) and M4(3) categories | Provincial codes based on the National Building Code; accessibility rules focus on non-residential and multi-unit buildings (check locally) | NCC, with the Livable Housing Design Standard adopted in many states |
| Wheelchair-user standard | ADA / ICC A117.1 for covered buildings | Category 3 bathrooms provide a 1500mm turning circle free of low-level obstruction | NBC barrier-free provisions and CSA standards for covered buildings | AS 1428.1 for covered buildings; Livable Housing is a lower bar |
| Step-free shower | Roll-in or transfer types in ADA section 608 | M4(2) expects provision for a future level-access shower | Varies; confirm locally | At least one hobless shower on the entry level under Livable Housing; varies by state |
| Wall reinforcement | Recommended; required for covered multifamily | Provision for future adaptations in M4(2) | Recommended; confirm locally | Reinforced walls so grabrails can be added later |
| Check locally? | State and local code | Local authority; is M4(2) or M4(3) a planning condition? | Provincial code | State adoption varies |
One line to remember: your building authority, not a blog post, decides what your project must meet.
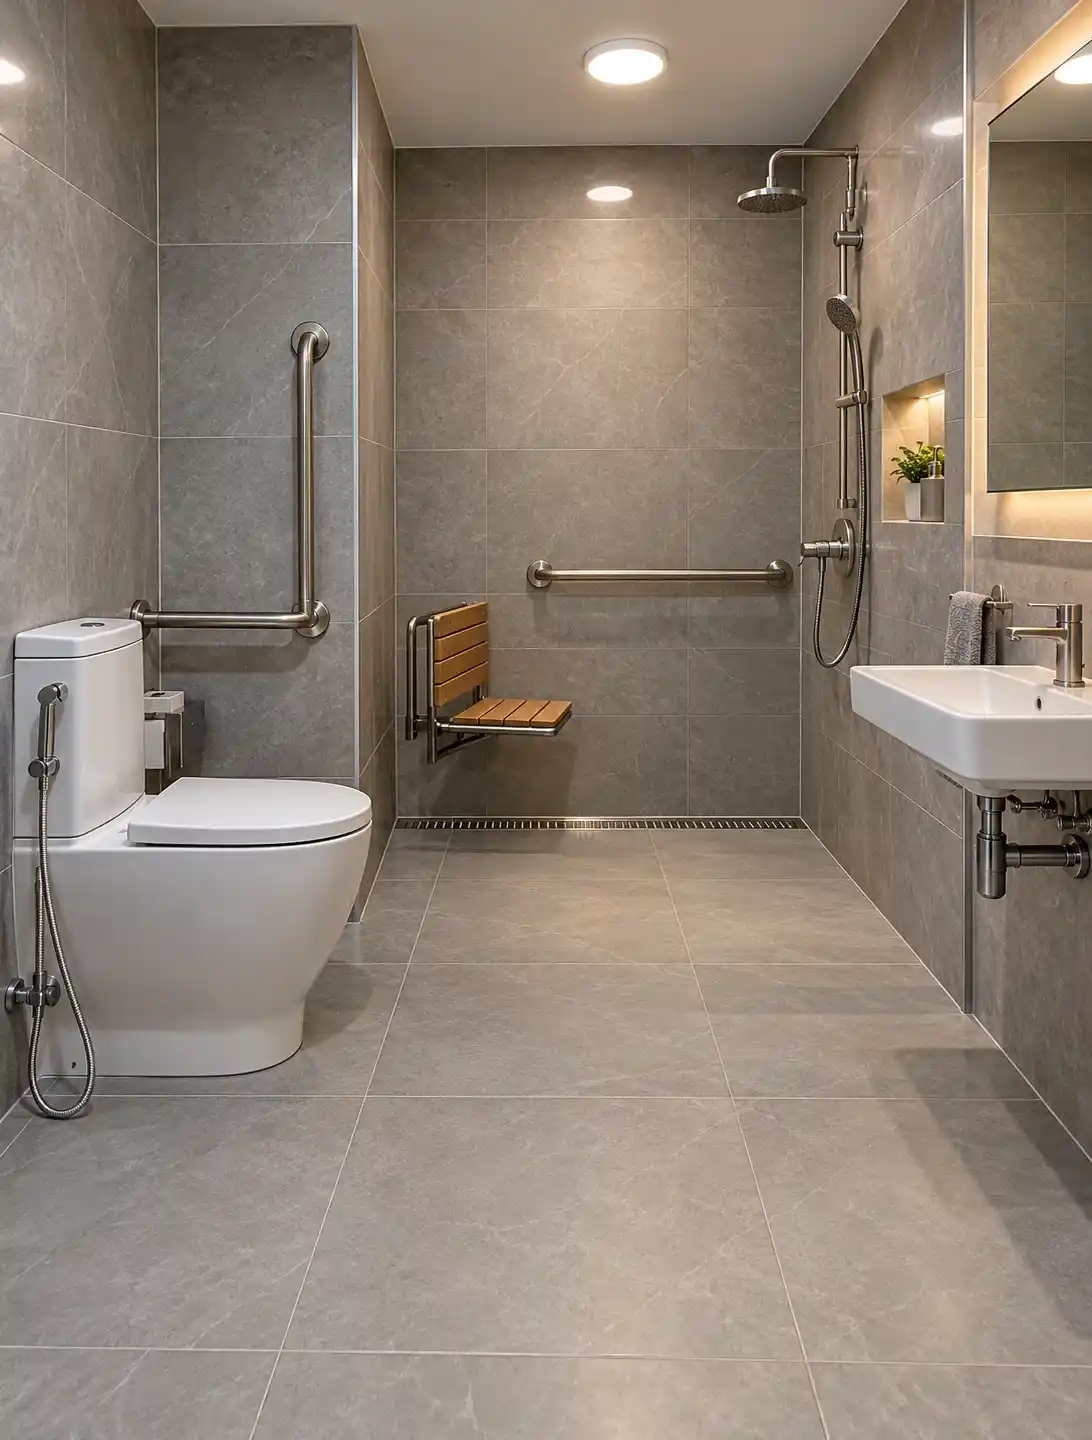
The ADA toilet room, measured: turning space, toilet, grab bars, sink and door
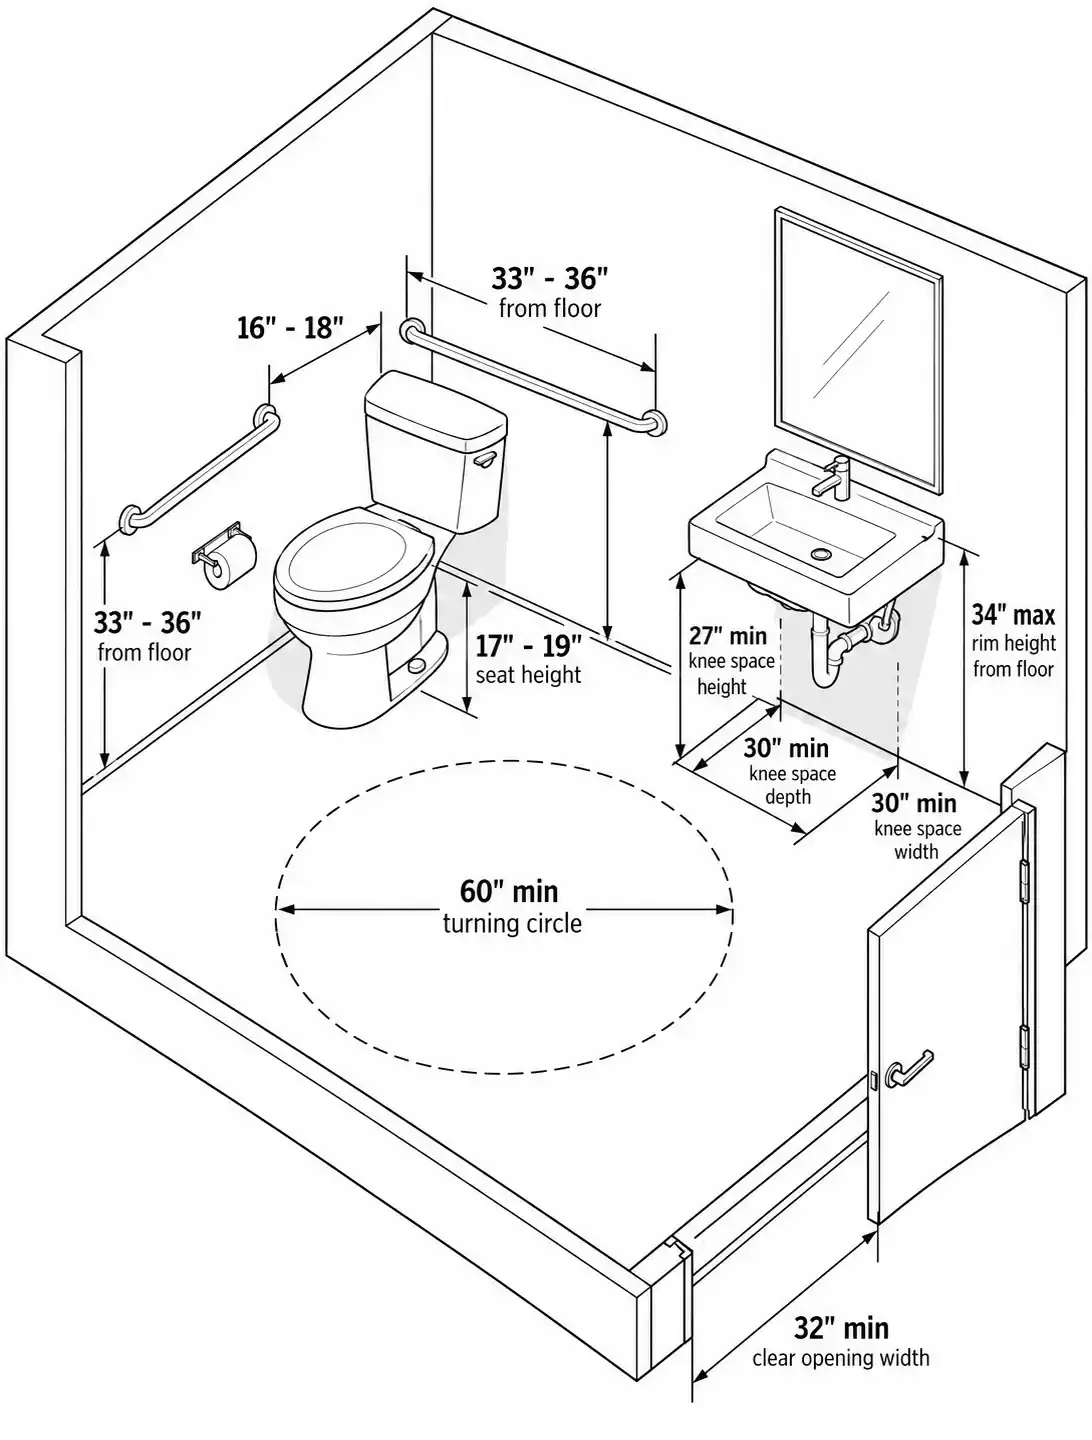
These figures follow the 2010 ADA Standards for Accessible Design. They don’t legally bind a private home, but they are the benchmark most designers use. Verify with your local building authority.
| Element | ADA minimum | Comfortable | Notes |
|---|---|---|---|
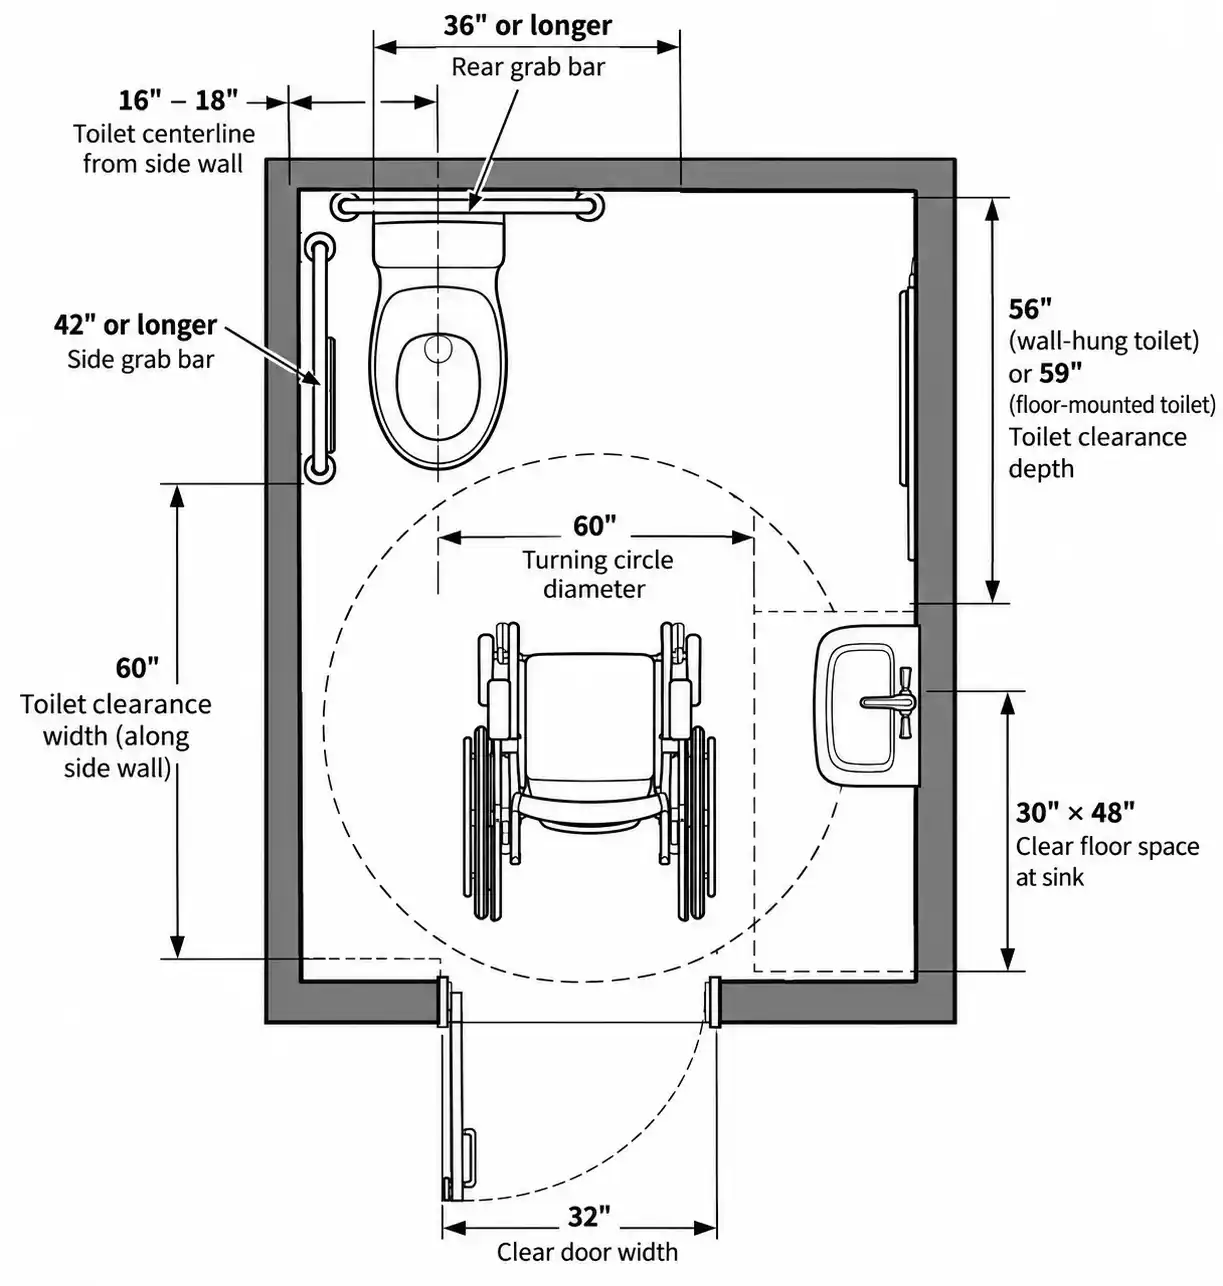
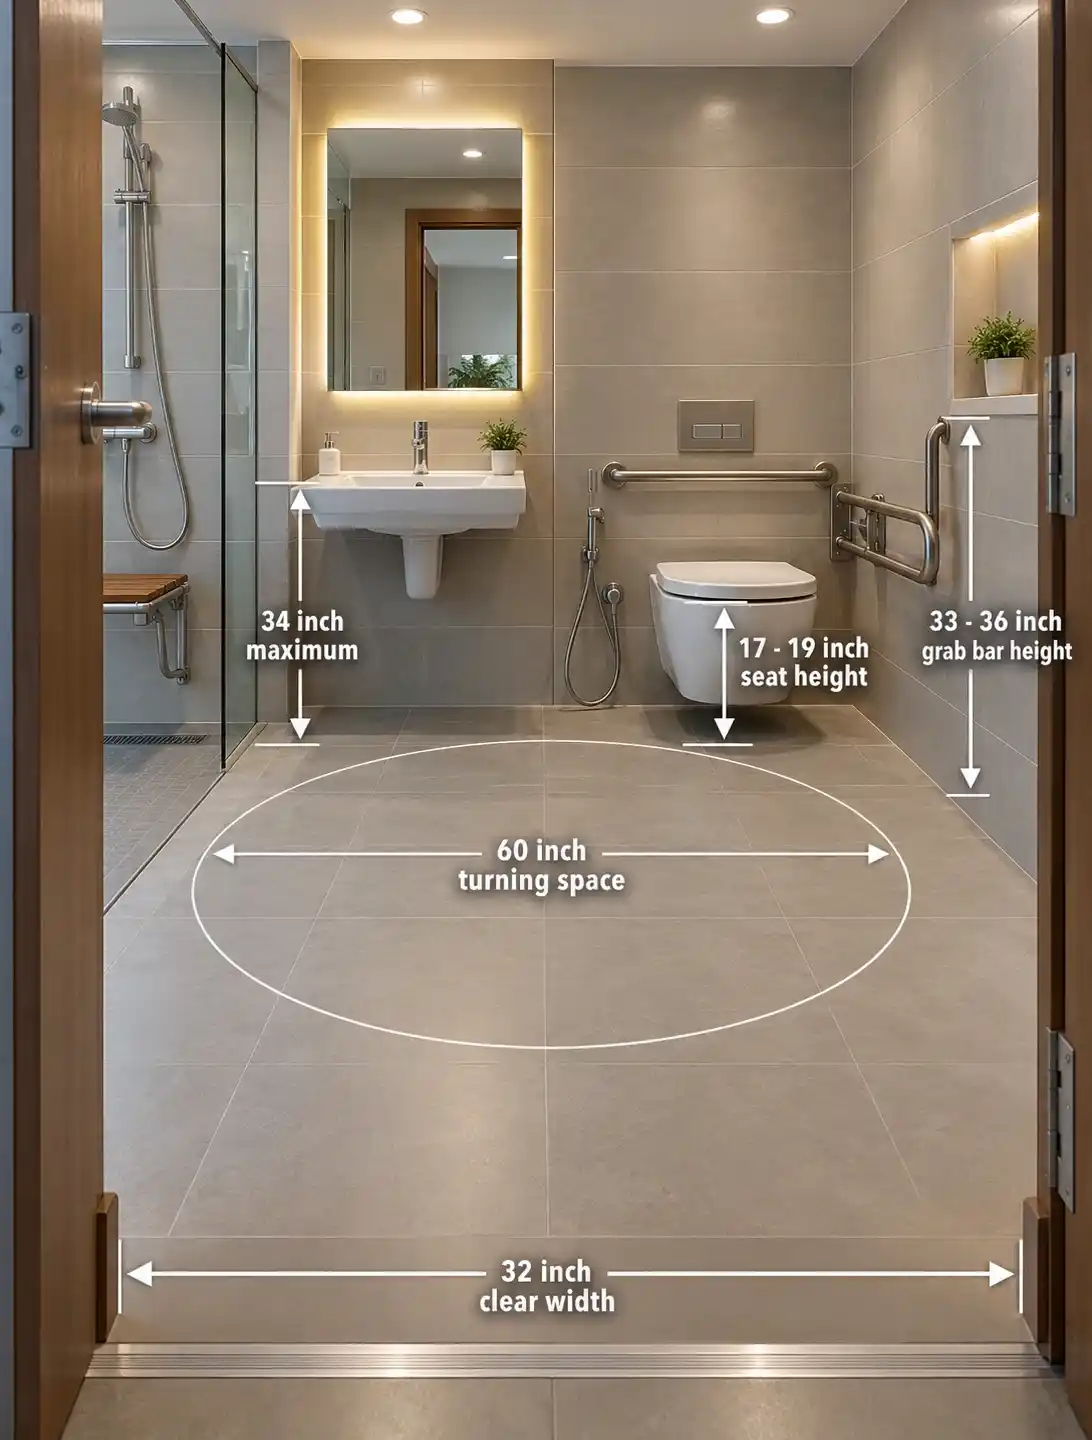
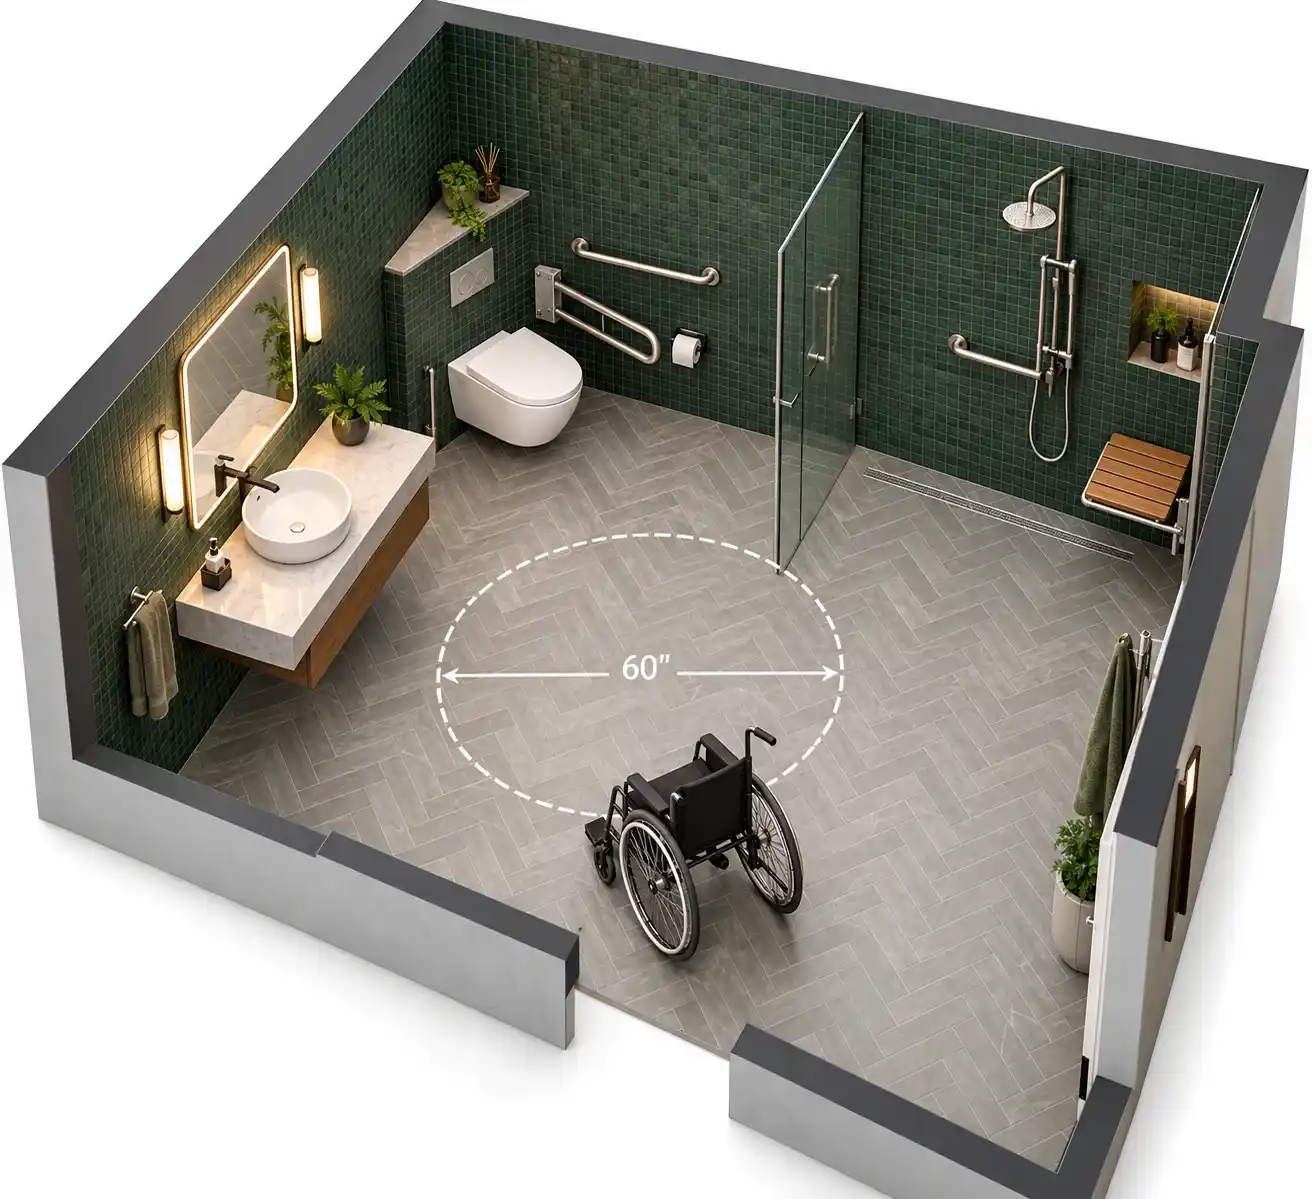
| Turning space | 60-inch circle (or T-shaped space) | Extra room for power chairs and a helper | Knee and toe space under fixtures can count toward it; floor must be level |
| Toilet clearance, side | 60 inches measured from the side wall | More width on the transfer side | Can overlap grab bars, dispensers and turning space; no other fixtures inside it |
| Toilet clearance, depth | 56 inches from rear wall (wall-hung) or 59 inches (floor-mounted) | Extra depth for a helper | Wall-hung toilets need a proper in-wall carrier |
| Toilet centerline | 16 to 18 inches from the side wall | Middle of the range | Mark it before the flange goes in |
| Seat height | 17 to 19 inches above finished floor | Comfort-height seat | Measure to the top of the seat |
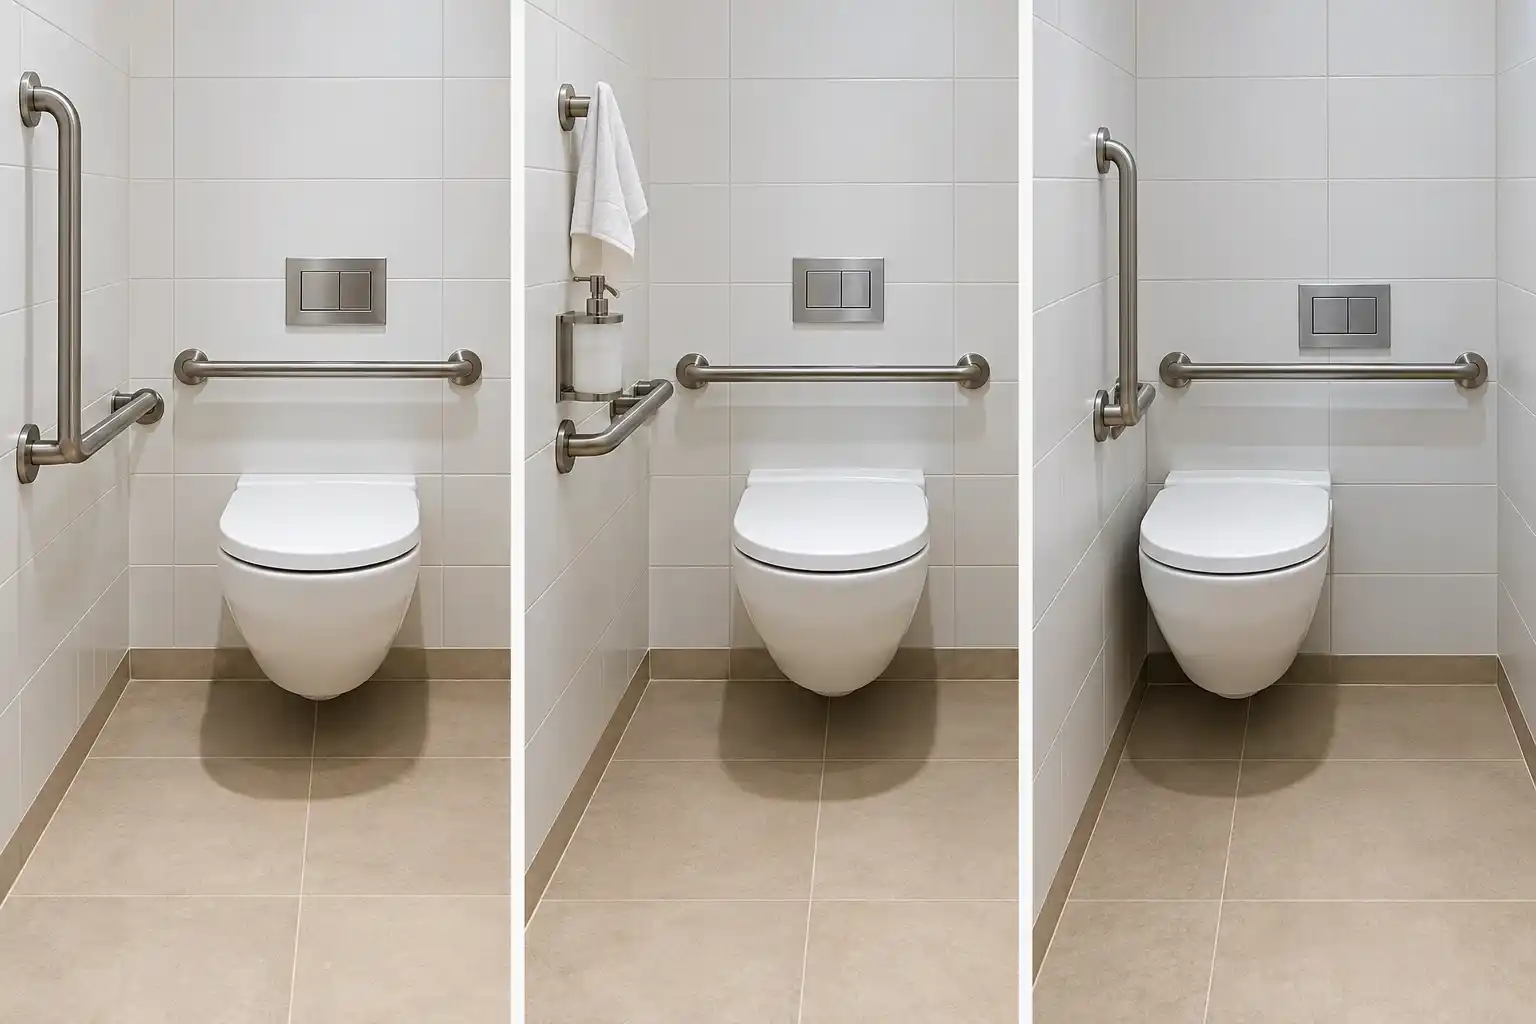
| Toilet grab bars | Side and rear walls, 33 to 36 inches above floor | Placed after checking the user’s reach and transfer side | Side bar commonly 42 inches or longer, rear bar 36 inches or longer (verify) |
| Bar-to-wall gap | 1.5 inches | Same | Keep dispensers and accessories clear of it |
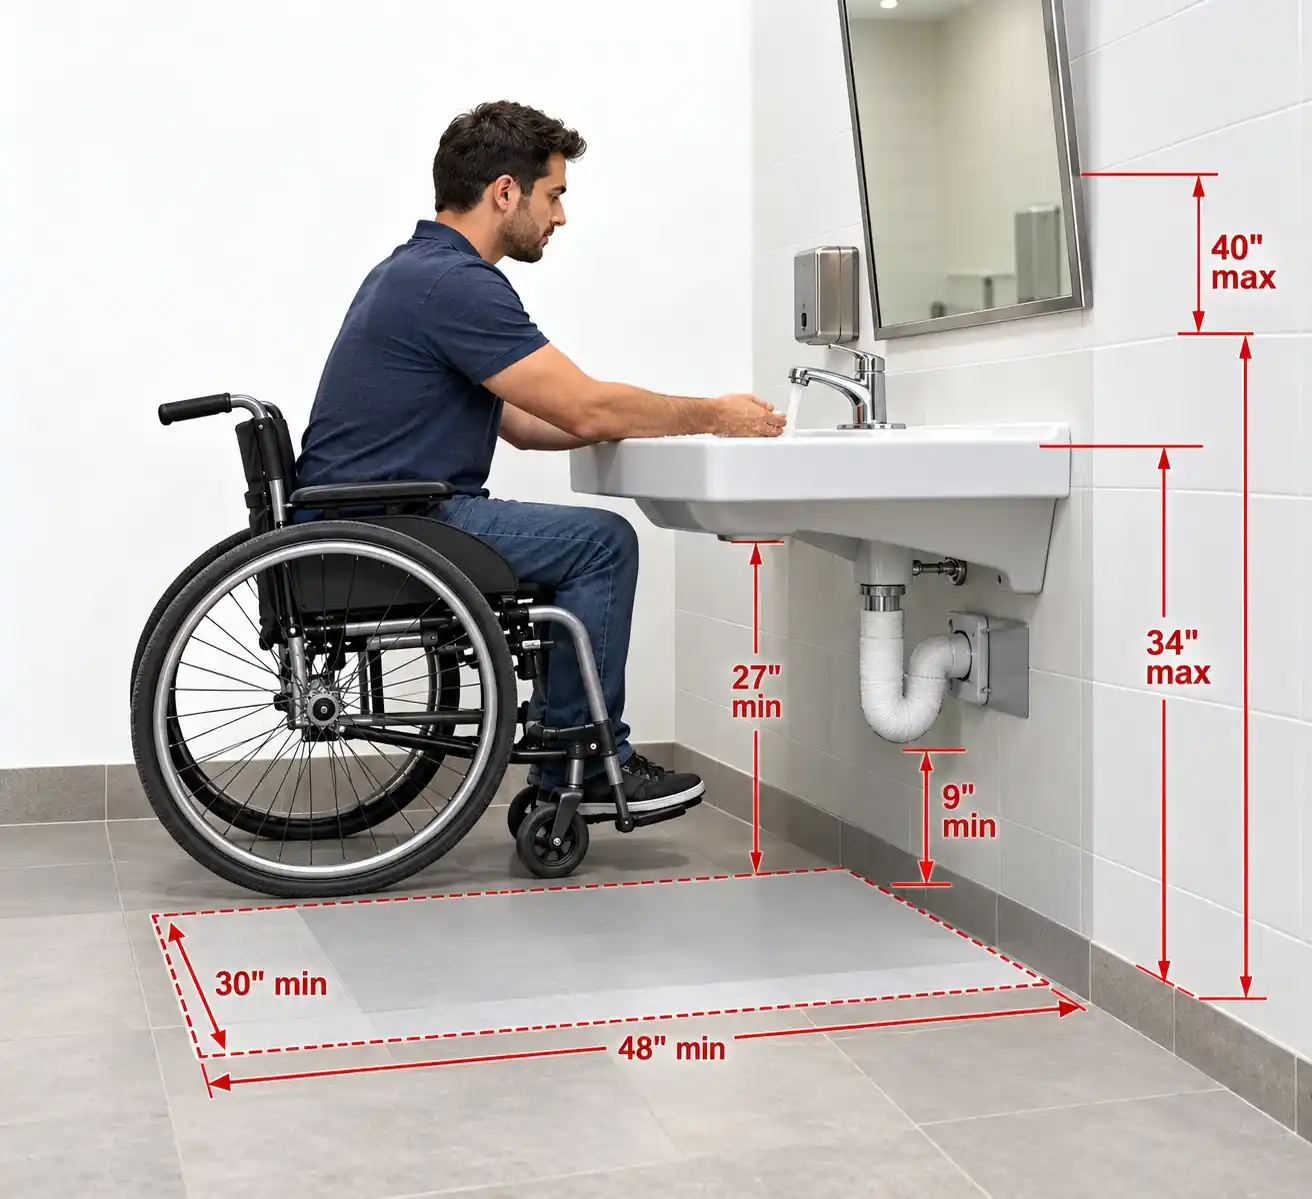
| Lavatory clear floor space | 30 by 48 inches | A bit wider | Knee clearance below; rim at 34 inches or lower |
| Door | 32 inches clear width (verify) | Wider for power chairs and helpers | See the swing rule below |
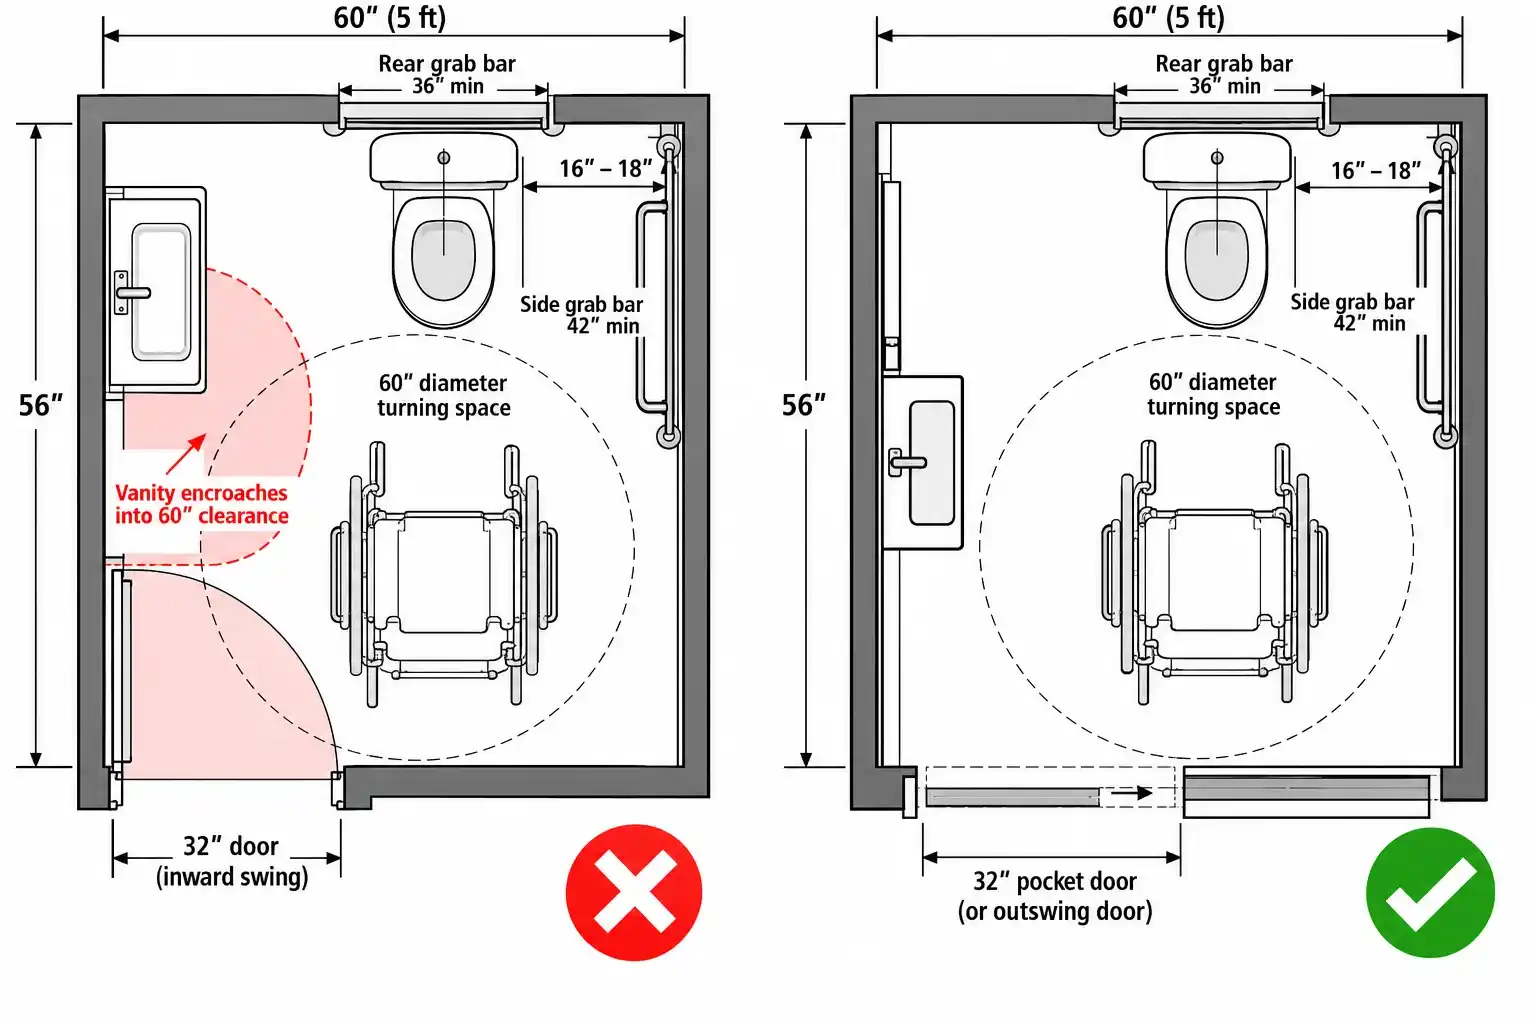
The overlap rule people miss. The toilet clearance can share space with grab bars, dispensers, other fixtures’ clear floor space and the turning circle. What it can’t share is a fixture. A vanity edge inside that 60-inch zone is the single most common failure, because it looks fine on a floor plan.
The door-swing rule. Doors normally can’t swing into the clear space of any fixture. A single-user toilet or bathing room gets an exception if a compliant clear floor space exists beyond the door’s swing arc. And if the door opens straight at the toilet, the toilet clearance can’t overlap the door’s own maneuvering space. A pocket or outswing door often fixes this for far less than a bigger room would cost.
Minimum is not comfortable. The numbers describe one person in a standard manual chair, with no helper. Power chairs and scooters are longer and wider. A caregiver assisting a transfer needs somewhere to stand. Most homeowners don’t realize the minimum quietly assumes the user does everything alone.
Roll-in, transfer or alternate roll-in: what the shower type decides
The shower is where a style choice turns into a structural one. Three compartment types exist, and each asks for a different footprint.
- Transfer shower: 36×36 inches inside, with a seat and a 36-inch entry. Suits someone who moves from a chair to the seat. Smallest footprint.
- Standard roll-in: at least 30 inches wide by 60 inches deep, with a 60-inch-wide entry on the open face and clear floor space beside it. Suits someone entering in a shower chair or with help.
- Alternate roll-in: 36 inches wide by 60 inches deep, with a 36-inch entry and a short wall that usually carries a seat.
A few practical notes from how these get built:
- A hand-held shower on a slide bar and controls reachable from the seat matter more daily than the tile does.
- A fold-down seat costs little and helps both users and helpers, but it needs solid blocking behind it.
- Thresholds should be low and beveled. The ADA allows roughly half an inch at most (verify), and a true curbless entry is easier to roll over than any ramp.
- A linear drain lets the floor slope in one direction, which makes curbless entries simpler to tile and easier to keep drained.
Here is what most guides skip: going curbless usually means recessing the floor. In a joist floor that is structural carpentry. On a slab it means cutting concrete. The shower base itself is rarely the expensive part.
What happens when a bathroom “meets the numbers” but still fails
An accessible bathroom can pass on paper and still be miserable to use. These are the failures that show up again and again.
- Vanity inside the toilet clearance. Fix: move it, or use a wall-hung unit outside the zone.
- Toilet centered by eye. The range is narrow. Fix: mark 16–18 inches from the side wall before setting the flange.
- Door swinging into the clearance. Fix: pocket door, outswing door, or confirm clear space beyond the swing arc.
- Grab bars into drywall alone. They loosen under load. Fix: blocking or solid backing behind every bar.
- Accessories inside the bar’s gap. Towel hooks and dispensers block the grip. Fix: keep the 1.5-inch space clear.
- Shower controls out of seated reach. Fix: put them near the seat and add a hand-held head.
- Slippery floor tile. Fix: slip-resistant finish with a slope that drains cleanly.
- Designing only for today. Fix: add blocking, wider doors and level thresholds now so a later conversion stays cheap.
⚠️ Warning: A grab bar is a safety device, not a towel rail. Anchor it into solid blocking or backing, never drywall alone, and test it before the first real transfer. If you can’t confirm what’s behind the wall, have a professional open it up.⚠️ Warning: A curbless shower is a plumbing and waterproofing project, not a tile project. A badly sloped floor or missing waterstop can leak into the room or the floor below. Use a licensed pro for the drain, the falls and the membrane.⚠️ Warning: Hot water scalds quickly when you can’t step out of the stream. Fit pressure-balancing or thermostatic valves, and check the water heater setting with scald risk in mind.
Can your house take it? Feasibility and the cost of changing your mind
Before anyone falls in love with a layout, find out what the house allows. Stack and drain position, floor type and wall contents decide more than the fixtures do.
| Change | Rating | What decides it | Who does it | Cost direction |
|---|---|---|---|---|
| Grab bar blocking (walls open) | Easy | Whether studs are exposed | Builder or carpenter | Lowest |
| Grab bars on finished walls | Moderate | Stud location, tile, wall type | Handyman or accessibility installer | Low to moderate |
| Pocket or outswing door | Moderate | Wall contents, framing, hallway side | Builder or carpenter | Moderate |
| Wall-hung accessible lavatory | Moderate | Plumbing in the wall, supply and drain positions | Plumber | Moderate |
| Tub to transfer or roll-in shower, same spot | Hard | Drain location, floor recess, waterproofing | Plumber plus tile and waterproofing pro | High |
| Curbless shower on a slab | Hard | Slab cutting, drain relocation, falls | Plumber, concrete and tile pro | High |
| Enlarge the room for a 60-inch turning space | Structural | Load-bearing wall? Space next door? | Structural engineer, builder | Highest |
The real money question is timing. Here is the same project, a tub-shower converted to a roll-in or curbless shower with blocking for grab bars, priced by when you change your mind. Figures are estimated ranges in USD, not quotes.
| Stage | What changing your mind looks like | Estimated added cost | What drives the variance |
|---|---|---|---|
| On paper | Revise the plan, pick a different shower type or door | $0–$500 | Whether a designer is involved |
| Before demolition | Reorder materials, shift fixtures | $200–$1,500 | Restocking, lead times |
| After rough-in and waterproofing | Re-frame, move the drain, redo the membrane | $1,500–$6,000+ | Slab vs timber floor, pipe run length, access |
| After tile | Remove tile, redo floor and waterproofing, relocate drain | $4,000–$12,000+ | Tile type, drain relocation, local labor rates |
Costs in the UK, Canada and Australia follow local labor and materials rather than a simple currency conversion. UK costs are labor-led and climb sharply in London. Canada often lands in a similar range, with older cold-climate housing adding subfloor surprises. Australia’s licensed-trade and waterproofing requirements typically keep totals at or above the US range. Get local quotes.
On resale: most buyers aren’t looking for a full roll-in conversion, but they notice wide doors, level thresholds and a bathroom that works for everyone. The cheap, convertible choices (blocking, a wider doorway, a low threshold) keep options open without committing the whole room.
Where DIY ends
Installing a shelf-height towel bar is DIY. Installing a load-bearing grab bar into verified blocking is a careful job that many handy homeowners can do, provided they can see what’s behind the wall. Past that point, call someone.
Bring in a plumber for any drain move or shower-base change. Use a licensed waterproofing or tile professional for curbless showers. Ask a structural engineer before removing or notching anything load-bearing, including joists for a recessed floor. An occupational therapist can also tell you what the user actually needs, which beats any table in this article. And check permit rules locally before you start.
FAQ
Do I have to follow ADA rules in my own home?
Generally no. The ADA, the Fair Housing Act’s accessibility provisions and most building codes don’t cover private single-family homes. Rules can still apply if you rent rooms to the public, run a business from the home, or your local planning conditions require accessible features. Many owners follow ADA dimensions anyway as a proven benchmark. Verify with your local building authority.
What size does an ADA bathroom need to be?
There is no single room size. The room has to hold a 60-inch turning space, the toilet clearance of 60 inches by 56 or 59 inches, and a lavatory with 30×48 inches of clear floor space. Because these can overlap, a well-planned single-user room can be compact, but it is usually much larger than a standard small bathroom. The practical route is often borrowing space from a closet or adjacent room.
What’s the difference between a roll-in and a transfer shower?
A transfer shower is 36×36 inches with a seat. A standard roll-in is at least 30 inches wide by 60 inches deep with a 60-inch entry, and an alternate roll-in is 36 by 60 inches. Transfer showers suit people who can move from a chair to a seat. Roll-in showers suit users who enter in a shower chair or with help.
What replaces the ADA in the UK, Canada and Australia?
The UK uses Building Regulations Approved Document M, with optional M4(2) accessible-and-adaptable and M4(3) wheelchair-user standards. Canada uses the National Building Code as adopted by each province, plus CSA standards. Australia uses the NCC, including the Livable Housing Design Standard, and AS 1428.1 for covered buildings. Adoption varies by region, so check with your local authority.
Can I add grab bars later without opening the wall?
Only if you can find solid backing. Bars fixed into hollow drywall can fail under load. If walls are open during a renovation, adding blocking costs far less than retrofitting later, even if you don’t install bars yet. For finished walls, have a professional locate studs or add backing from behind where possible.
Layout, Space & Structural Considerations
- Minimum Size for a Full Bathroom: The Real Numbers (and Why Code Minimum Isn’t the Whole Story)
- How to Make a Small Bathroom Feel Bigger: Layout Fixes Ranked by Impact and Cost
- How Much Does It Cost to Move Plumbing in a Bathroom Remodel? (Estimated Ranges by Type of Move)
- Converting a Tub to a Shower: Does It Hurt Resale Value?
- How Much Does It Cost to Add a Bathroom to a House?
- Half Bath vs. 3/4 Bath: What’s the Real Difference (and Does It Count as a Full Bathroom?)
- What Size Exhaust Fan Do I Need for My Bathroom? (CFM, L/s and Real-World Adjustments)
- ADA Bathroom Requirements: What the Rules Say and What Actually Applies to Your Home
- What Is a Wet Room? How It Differs From a Walk-In Shower (and Whether Your House Can Take One)
- Bathroom Window Placement and Privacy: Where Windows Should Go (and How to Fix the Ones in the Wrong Spot)
.webp)
.webp)